I made this project while I was in Mold Making and Ceramics. The idea during this project was to make this piece look as close to a real piece of food as possible. Other people in my class made things like a pizza and ice cream cones. This was probably one of my more time consuming projects. It took me a long amount of time to make this project so I am proud of it. This class made it possible for me to be able to make this project and many others that I am very proud of. I learned a lot about ceramics and how to shape and mold clay. The environment in the classroom was probably the best of any of my classes this year. When you walk into this class you don’t feel stress and anxiety.
Author: garret.hoefs
1½ cups creamy peanut butter- 6 tablespoons unsalted butter
- 1 tablespoon vanilla extract
- 2 cups powdered sugar
For the Brownies:
- ⅓ cup Dutch-processed cocoa powder
- ½ cup + 2 tablespoons boiling water
- 2 ounces unsweetened chocolate finely chopped
- 4 tablespoons unsalted butter melted
- ½ cup + 2 tablespoons vegetable oil
- 2 eggs
- 2 egg yolks
- 2 teaspoons vanilla extract
- 2½ cups granulated sugar
- 1¾ cups all-purpose flour
- ¾ teaspoon salt
- 1 cup semisweet chocolate chips optional
Directions
-
Adjust oven rack to lowest position and preheat oven to 350 degrees F. Spray a 9×13-inch pan with non-stick cooking spray, then line with parchment paper, leaving about a one-inch overhang on the sides.
-
Prepare the Peanut Butter Filling: Melt the peanut butter and unsalted butter together in a medium bowl in the microwave until completely melted and smooth, 1 to 2 minutes, stirring occasionally. Whisk in the vanilla extract, then gradually whisk in the powdered sugar until completely smooth. Set aside while you prepare the brownie batter.
-
Prepare the Brownies: Whisk the cocoa powder and boiling water together in a large bowl until smooth. Add the unsweetened chocolate and whisk until the chocolate is melted. Whisk in the melted butter and oil (the mixture may look curdled at this point, that’s okay!). Add the eggs, yolks, and vanilla extract, and whisk until smooth and homogeneous. Whisk in the sugar until fully incorporated. Add the flour and salt and mix with a rubber spatula until combined. Fold in the chocolate chips, if using.
-
Pour half of the batter into the prepared pan, spreading into an even layer.
-
Turn the peanut butter filling out onto a clean work surface and press into a rough 9×13-inch rectangle. Transfer that filling using your fingers or a thin metal spatula onto the brownie batter in the pan. You can do this in sections and it doesn’t have to be perfect. Pour the remaining batter over the peanut butter filling and gently spread into an even layer.
-
Bake until a toothpick inserted halfway between the edge and center comes out with just a few moist crumbs attached, 28 to 35 minutes. Transfer the pan to a wire rack and cool for 1½ hours.
-
Using the parchment overhang, lift the brownies from the pan. Place the brownies on the wire rack and cool completely, about 1 additional hour. Cut into squares and serve. The brownies can be stored in an airtight container at room temperature for about 4 days.
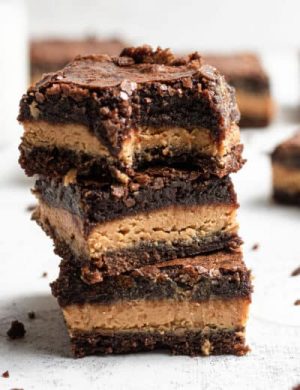
1.The construction of the brownies went well. Putting them in the pan we spread the layers evenly.
2. Don’t make the peanut butter filling to thick if it is to thick it will be to hard to spread.
3.I would give this a 8 on the level of goodness because they were really rich but still good. Although they tasted good they were the healthiest.
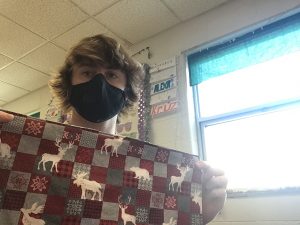
Sewing project
1.https://www.google.com/url?sa=t&rct=j&q=&esrc=s&source=web&cd=&ved=2ahUKEwi93bW97eHtAhWbGs0KHdbXA70QFjABegQIBhAC&url=https%3A%2F%2Fwww.youtube.com%2Fwatch%3Fv%3DrW8twY-HHqU&usg=AOvVaw2uhWw73oLWc03Rtf0YcHnn
2.The finishing seam turned out very nice.
3.press the seams so they are sharp and make the corners sharp too.
4.beginner to intermediate just because it takes some experience to be able to cut the fabric consistently.
https://www.educationquest.org/login/?redirect_to=https://www.educationquest.org/myeducationquest/activities-resume/
 American Sniper
Autobiography
William Morrow and company
January 2,2012
Ebook
448
The Shot Heard Around the World
Garret Hoefs, Omaha World Herald
Location: Sadr city, Iraq
Time:August 2008
In 2008 a record shot distance was recorded in Iraq. A group of marines providing overwatch for another group of marines and the shooter Chris “the Legend” Kyle spotted an insurgent on the top of a rooftop. He was aiming his weapon right at his fellow Marines. Kyle was ready to take the shot but his commander was not ready as he ordered him not to as it would give away their position and it would make it very difficult to get out of the building they were in.
Kyle lined up the shot and kept his eyes on the man. He soon lost interest he suddenly saw the man start shooting at his fellow marines. Kyle quickly urged his commander to let him take the shot as marine after marine was fell. He finally allowed him to take the shot he breathed in and half a breathe out and pulled the trigger, “splat” as the bullet hit the insurgents from a record 2100 yards.
Now the tricky part came getting out of the building. After Kyle had shot he had given away his position and now armed insurgents (who wanted to kill them)were coming for them. The sandstorm that was viciously bouncing of the Soldiers skin there was screams as the violence raged on. Suddenly they decided to make a run for the humvee most of the soldier after soldier they piled in with no regard for comfort and they took off.
After Kyles honorable discharge he calls this amazing task “a straight up luck shot” according to reports. He now remains at home with his family in Chalk Mountain, Texas with his two children and wife. He suffers from trauma from the war and often wakes up in the middle of the night just punching at thin air.
On February 2,2013 Kyle and his friend Chad Littlefeild were shot and killed by Ray Routh. He went down in history as Americas most lethal Sniper.
So, you have a website now. You’re probably wondering why. Well, there are a couple of reasons (in no particular order):
- To establish your online identity. Having your own website will give you a little more control over what people find when they search for your name. Instead of finding random links that you have no control over, they will see the interesting things that you’ve been working on.
- Getting a job can be easier. Most employers will search for your name as part of their hiring process. Having your own great looking website can really show employers that you are talented and that you care about the work that you do. Employers can learn more about you and see examples of the kind of work you can do. You can even put your resume on your website.
- Getting into the college you want can be easier too. Just like employers, college admission counselors also search for college applicants names. This gives you a chance to be in control of what they see and to show them your interests and accomplishments as well as the kind of work you are capable of producing.
- Reach an actual audience. When you write a great paper, wouldn’t it be nice to have more people read it than just your teacher? Share your work with your friends and with the world. Many people find that they write better (or at least more thoughtfully) if they know more people will read what they wrote.
- Showcase your talents in one place. It doesn’t matter whether your talents are in writing, drawing, singing, playing an instrument, acting, video editing, sports, academics, communicating or anything else. A website gives you a chance to shine.
- Learn how to build a website. We’re using WordPress to build our websites, and WordPress is used by about 25% of the sites on the internet. The Wall Street Journal, General Motors, The Rolling Stones, Microsoft and NASA use WordPress. And that’s not to mention several famous individuals: Kobe Bryant, Katy Perry, Jay-Z, Chuck Yeager, Garth Brooks and Mr. Sommerer. Being able to build a website is a valuable skill.
By the way, you can delete this post when you’re done reading it. If you leave it on your site, it will seem a little odd to people. There are a couple of more interesting things you could do instead of deleting it:
- You could rewrite the top part in your own words. It’s pretty common to have a post (or page if you prefer) saying why you are building a website. But you don’t have to do that. It’s okay to have a website without that too.
- Instead of deleting it (in WordPress they use the phrase “Trash” or “Move to Trash”) , there are two other things you could do to this post. You can change it’s Status from “Published” to “Draft”. Then it will be available to you in the admin section of your website, but people who visit your site won’t see it. Or, you could change the Visibility from “Public” to “Private”. If you do that, then you’ll still see it on your website (if you are logged in), but other people will not.
Short Answer: It’s your website; put anything you want on it. Make sure it is professional, thoughtful and kind.
Longer Answer: You will occasionally be asked by one of your teachers to put something that you create for class on your website. They might do this to help you share something great that you did with the rest of the world. They might do it so that you can get feedback from a wider audience. But I hope you also put things up just because you want to. A recap of your latest game? Something in the world that you want to share your opinion about? The cute thing your little sister did? What you thought about the book you read? The Movie you saw? The possibilities are endless.
But remember, the whole world can read what you write. Make sure you proof read it before you publish it. Make sure it’s not Too Much Information (don’t share things that are too personal). Make sure it’s kind.
Finally, your website should look professional. Your website isn’t Facebook, Twitter or Instagram. Posts to your website should have some thought and substance to them. Pick the right tool for how you want to communicate. Sometimes that will be Facebook, sometimes Twitter and sometimes it will be your website.
By the way, you can delete this post when you’re done reading it. If you leave it on your site, it will seem a little odd to people.

Congratulations, you now have a website. You might be wondering, “Why do I have a website?” That’s a question for a different post. Of course, having a website is a little bit of a responsibility. Here are some things that you should keep in mind now that you have one.
- Don’t post information that is too personal on your website. You shouldn’t post your address or phone number. You shouldn’t post anything that you would be upset about if everyone in the school (or the world) found out about.
- Give people a little context before you start writing. You might start a post off with something like this, “This post is a reflection on the third chapter of John Steinbeck’s novel, Of Mice and Men. I wrote this when I was in 10th grade for English class.”
- People will eventually comment on things that you put on your website. If the comment looks like spam, you should delete it. If you don’t delete it, you will get a lot more spam. They target people who do not delete spam. If a comment isn’t nice, you should delete it too. You want your website to be a nice spot to visit.
- Try to avoid being negative. If there’s something that you want to write about and it sounds like a complaint, why not try to write it as a suggestion on how something can be improved instead. I’m sure you get bonus points every time your website makes the world a better place.
- Be a little bit selective about what you decide to put on your website. It should be a little more professional than Facebook, Twitter or Instagram.
- What you write is more important than how your website looks, but having a good looking website says something to your visitors too. If you need help with your website, ask someone who has a nice looking website. Or you can ask at help.lincolnlutheran.org. You can also stop by the Tech Center.
- How you classify posts is important. Always click on a Class and Grade before you post. If it applies, click on one or more Categories and Interests as well. This will help other people find what they are looking for on your site.
- You can add other Interests (or delete some). You do that from the Posts menu. You can also add Classes. In fact, you’ll have to. Pro Tip: You can say item they should appear under by setting the Parent item. Once you add more Interests or Categories, remember to put them in your menu as well. You’ll find that under Appearance.
- In the Plugins menu, there are other tools that you can add to your website. But don’t keep them unless you use them, because every plugin slows your website down a little bit. After you get good at using the basic WordPress tools, and you’ve written a few dozen posts, you can upgrade your account to have access to more tools.
- Most of the content on your website will be posts, but you can also publish pages. You use pages for things that will never (or very seldom) change. If you make a page, don’t forget to add it to your menu.
- Images can make your website more fun. Sometimes it’s easy to pick an image. Just take a picture of what you are writing about. But remember that if you use an image off the internet that you should have permission to use it. You can get images like that from Google or Flickr. Those links go to the sections of Google and Flickr image search where people put images for other people to use.
By the way, you should probably make it so that other people can’t see this post. There’s a lot of advice here, so rather than delete it, do one of these things: Change it’s Status from “Published” to “Draft”. Then it will be available to you in the admin section of your website, but people who visit your site won’t see it. Or, you could change the Visibility from “Public” to “Private”. If you do that, then you’ll still see it on your website (if you are logged in), but other people will not.